Auditing and reporting scenarios in Exchange Online often involve scripts that run unattended. In most cases, these unattended scripts access Exchange Online PowerShell using Basic Authentication (username and password). However, basic authentication for Exchange Online Remote PowerShell will be retired in the second half of 2021. As an alternative method, Microsoft has recently announced the Public Preview of a Modern Authentication unattended scripting option. As such, if you currently use Exchange Online PowerShell cmdlets in unattended scripts, you should look into adopting this new feature. This new approach uses Azure AD applications, certificates and Modern Authentication to run non-interactive scripts!
How does it work?
The EXO V2 module uses the Active Directory Authentication Library to fetch an app-only token using the Application ID, Azure Tenant ID, and a digital certificate thumbprint. The application object provisioned inside Azure AD has a Directory Role assigned to it (like Exchange Administrator), which is returned in the access token. Exchange Online then configures the session RBAC using the directory role information that is available in the token.
Configuring app-only authentication
This feature is still in Public Preview and requires version 2.0.3-Preview or later of the EXO PowerShell v2 module (available via PowerShellGallery).
To install the Preview release of the EXO v2 module, run the
following command:
Install-Module -Name ExchangeOnlineManagement -RequiredVersion 2.0.3-Preview -AllowPrerelease
If already installed, you can update an earlier version of
the of the EXO v2 module by running the following command:
Update-Module -Name ExchangeOnlineManagement -AllowPrerelease
Step 1: Application registration in Azure AD
- Go
to the Azure AD portal at https://portal.azure.com/
and sign in with your Azure AD account;
- Under
Manage Azure Active Directory, click View;
- Under
Manage, select App registrations and then click New
registration;
- In
the Register an application page that appears, configure the
following settings:
- Name:
Enter something descriptive.
- Supported
account types: select Accounts in this organizational directory
only (Microsoft).
- When
you are finished, click Register;
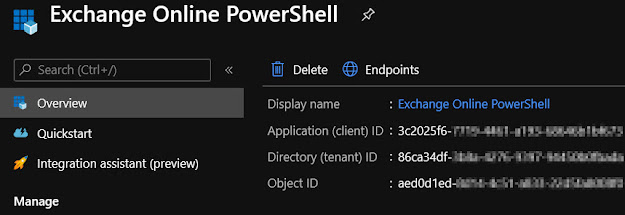
- In
my case, I called it Exchange Online PowerShell:
Step 2: Assign API permissions to the application
Next, we need to assign it permissions to manage Exchange
Online as an app. An application object has the default permission User.Read.
For the application object to access Exchange Online resources, it needs to
have the application permission Exchange.ManageAsApp. API permissions
are required because they have consent flow enabled, which allows auditing
(directory roles do not have consent flow).
- Select
API permissions;
- In
the Configured permissions page that appears, click Add
permission;
- In the flyout that appears, scroll down to Supported legacy APIs and select Exchange:
- In
the flyout that appears, click Application permissions;
- In the Select permissions section, expand Exchange and select Exchange.ManageAsApp and then Add permissions:
- Back
on the Configured permissions page, click Grant admin consent
for “tenant name” and select Yes in the dialog that appears.
Ensure the permissions have been granted (green tick):
Step 3: Generate a self-signed certificate
There are multiple ways to create a self-signed X.509
certificate. You can use the Create-SelfSignedCertificate
script or the makecert.exe tool from the Windows SDK for example. Personally,
I found the easiest way to be the New-SelfSignedCertificate
PowerShell cmdlet. The following example creates a self-signed certificate and
places it in my personal certificate store:
New-SelfSignedCertificate -Subject “ExO-PS-Nuno” -KeyExportPolicy
“Exportable” -CertStoreLocation cert:\CurrentUser\My -Provider “Microsoft
Enhanced RSA and AES Cryptographic Provider”
While we are here, take note of the certificate’s thumbprint as we will need it in the final step.
It might be obvious, but I should mention that the certificate has to be installed on the user certificate store of the computer where you want to connect to Exchange Online from.
Next, export the certificate using the format .CER (we will need it in the next step):
Step 4: Attach the certificate to the Azure AD
application
- In
the Azure AD portal under Manage Azure Active Directory, click View;
- Under
Manage, select App registrations;
- On
the App registrations page that appears, select your application;
- Under
Manage, select Certificates & secrets;
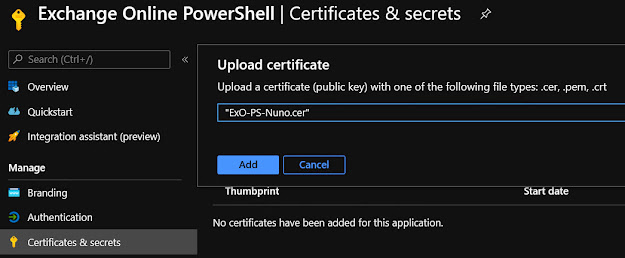
- On the Certificates & secrets page, click Upload certificate:
- In
the dialog that appears, browse to the self-signed certificate you created
in the previous step, and then click Add:
- The
certificate is then uploaded and added to the application:
Step 5: Assign a role to the application
One thing to note with this method is the lack of RBAC
controls. We simply cannot take advantage of the granular controls Exchange
offers with RBAC... Instead, what the service principal can and cannot do is
determined by the role it is assigned in the Azure AD portal. We can play with
the roles and actions assigned to these role groups, but those changes will
obviously affect anyone assigned the same role.
Azure AD has more than 50 admin roles available. For
app-only authentication in Exchange Online, the following roles are currently
supported:
- Global
administrator
- Compliance
administrator
- Security
reader
- Security
administrator
- Helpdesk
administrator
- Exchange
administrator
- Global
Reader
- In
the Azure AD portal under Manage Azure Active Directory, click View;
- Under
Manage, select Roles and administrators;
- Select
one of the supported roles. On the Assignments page that appears,
click Add assignments;
- In
the Add assignments flyout, find and select the application, and
then click Add:
- Our application now has Exchange administrator rights:
Step 6: Connect to Exchange Online PowerShell
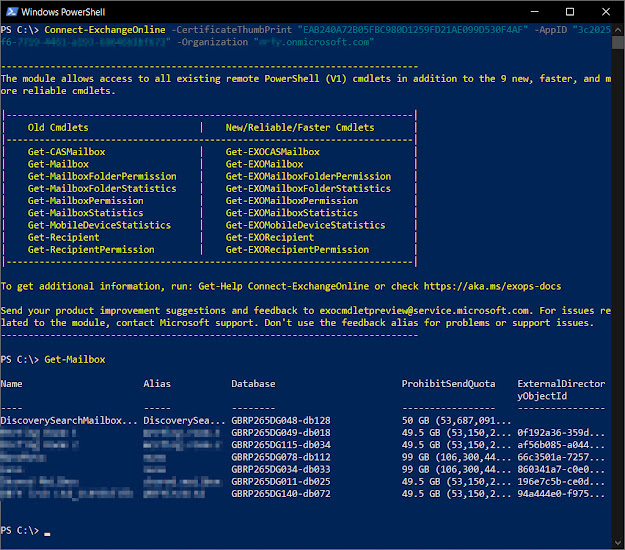
The final step is to connect using our certificate’s
thumbprint. To do this, we run the following cmdlet:
Connect-ExchangeOnline -CertificateThumbPrint “EAB240A72B05FBC980D1259FD21AE099D530F4AF”
-AppID “3c2025f6-xxxx-xxxx-xxxx-xxxxxxxxxxxx” -Organization “xxxxxx.onmicrosoft.com”
And there you go! 😊
If you don’t want to install the certificate, you can actually connect using the local .pfx certificate instead:
Connect-ExchangeOnline -CertificateFilePath “C:\Users\nuno\Documents\Exo-PS-Nuno.pfx” -AppID “3c2025f6-xxxx-xxxx-xxxx-xxxxxxxxxxxx” -Organization “xxxxxx.onmicrosoft.com”
Important Considerations
As any other action performed in Exchange Online, any
changes we do via this new method still results in them being captured in the
Admin audit log and, in turn, in the Unified Audit log in Office 365. A
downside I should highlight, is that any actions performed using this method
will list the application as the user performing the action. As such, it might
be a good idea for any admin to have their own application so that actions can
be correctly audited and tracked.
Another important thing to keep in mind when using this new method, is that its authenticating flow against Azure AD is not subject to Conditional Access policies and MFA enforcement. While this can be great as it allows us to enable automation, you must take extra care to secure your app details and certificate’s private key, as anyone who gets their hands on them can easily reuse them from anywhere...


No comments:
Post a Comment