
For hybrid/federated environments, Azure AD Connect is a crucial service. Azure AD Connect Health provides invaluable information such as alerts, performance monitoring, usage analytics, and other information, but sometimes we need some flexibility on what gets alerted, how, and when.
By default, Azure AD Connect performs a delta sync every 30 minutes. However, what if something happens and it hasn’t been able to perform a sync for 5h? For large organisations, this can be a huge issue as it will impact a variety of services, such as the onboarding of new staff, changes made to groups, changes made to Office 365 services, etc.
In this post, I will show a way of using Graph API to monitor the time Azure AD Connect last performed a sync so we can get an alert when this goes above a specified threshold.
Since we are using Graph API, you will need an Azure App
Registration with Organization.Read.All application permissions (check here
for other permissions that also work).
Once we have our app registration in place, we use the get organization
method to retrieve the properties and relationships of the currently
authenticated organisation.
If you want to use PowerShell, this is extremely easy with the new SDK. All you have to do is run the following (simplified for brevity reasons):
Import-Module Microsoft.Graph.Identity.DirectoryManagement

Connect-MgGraph

(Get-MgOrganization -OrganizationId "xxxxx-xxxx-xxxxx” -Property OnPremisesLastSyncDateTime).OnPremisesLastSyncDateTime
In this post, however, I’m going to show how to do this, including the alerting, using Power Automate. The first step, after creating a new flow of course, is to schedule it to run at a frequency we desire. In my case, I am running it every 2h because I want to be alerted whenever a sync hasn’t happened in over 2h:

Next, we need to be able to query Graph API, and for that,
we need an OAuth token. There are multiple ways of doing this in Power Automate,
so feel free to use whatever method you prefer if you already have one. For the
method I have been using lately, first we need to initialise three variables
that will contain our Azure tenant ID, the ID of our Azure app registration, and
its secret:

Now we send an HTTP POST request to https://login.microsoftonline.com/$TenantID/oauth2/token
in order to retrieve our token. In the request, we need to pass our app
registration details. Again, there are multiple ways to achieve the same, below
is the method I’ve been using:

If all goes well, we should now have a valid OAuth token
that we can use to query Graph API. Save your flow, test it, and make sure you
don’t get any errors. You should see the following in the run history: a status
code of 200, and the token details in the OUTPUTS section.

Now that we know our flow works successfully in retrieving
an OAuth token, we create a new step where we parse the JSON that gets returned
by the previous step. This is because we only need the access_token
information (listed at the bottom of the previous screenshot). To do this, we
use the Parse JSON action of the Data Operation connector. Under Content,
we use the Body from the previous step, and under Schema, you can
use the following:
{
    "type": "object",
    "properties": {
        "token_type": {
            "type": "string"
        },
        "expires_in": {
            "type": "string"
        },
        "ext_expires_in": {
            "type": "string"
        },
        "expires_on": {
            "type": "string"
        },
        "not_before": {
            "type": "string"
        },
        "resource": {
            "type": "string"
        },
        "access_token": {
            "type": "string"
        }
    }
}
We can now retrieve the information we want! At the most basic level, we issue a GET request to the following URL: https://graph.microsoft.com/v1.0/organization/our_tenant_id
However, this will return a lot of information we don’t
need, so we ask only for the onPremisesLastSyncDateTime by using $select:

Like before, we need to parse the JSON that gets returned so
we can more easily use the information retrieved:

For the Schema, you can use Graph
Explorer to run the same GET request. Then, copy the Response preview and use it
as your sample in Generate from sample.

{
    "type": "object",
    "properties": {
        "@@odata.context": {
            "type": "string"
        },
        "onPremisesLastSyncDateTime": {
            "type": "string"
        }
    }
}
We now have all the information we need. I suggest you test
your flow once more to make sure everything is working as expected. If it is,
you should get the following:

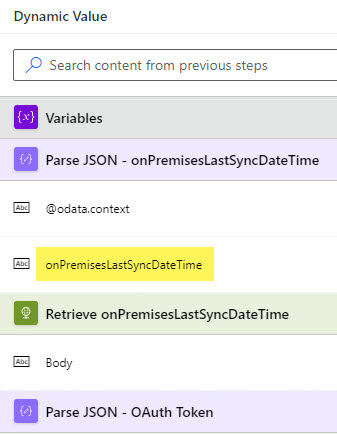
Although INPUTS and OUTPUTS seem identical, by parsing the
JSON we now have an onPremisesLastSyncDateTime dynamic property we can
use in our flow, something we don’t get without parsing the JSON:
The next step is to check when the last sync happened.
Keeping in mind that the returned date/time is in UTC format, we can use the
following formula to check if onPremisesLastSyncDateTime is less than (aka
older) the current UTC time minus 2h. If it is, then we know the last successful
sync happened over 2h ago and we send an alert.
Simply copy-paste the following formula in the first field
of you Condition (unfortunately it’s no longer possible to edit
conditions in advanced mode):
less(body('Parse_JSON_-_onPremisesLastSyncDateTime')?['onPremisesLastSyncDateTime'],
addminutes(utcnow(), -120))
If the result is no, then a sync happened less than 2h ago,
so we can successfully terminate the flow. Otherwise, we can send a Teams
notification (or email, or whatever method you prefer):

<p>Last Azure AD Connect Sync was <span style="color: rgb(226,80,65)"><strong>@{div(sub(ticks(utcNow()),ticks(body('Parse_JSON_-_onPremisesLastSyncDateTime')?['onPremisesLastSyncDateTime'])),600000000)}</strong></span> minutes / <span style="color: rgb(226,80,65)"><strong>@{ div(sub(ticks(utcNow()),ticks(body('Parse_JSON_-_onPremisesLastSyncDateTime')?['onPremisesLastSyncDateTime'])),36000000000)}</strong></span> hours ago (@{body('Parse_JSON')?['onPremisesLastSyncDateTime']} UTC)!</p>
This code produces the following message:
But what are those two weird formulas? That’s how we
calculate the difference between two dates and times:
div(sub(ticks(utcNow()),ticks(body('Parse_JSON_-_onPremisesLastSyncDateTime')?['onPremisesLastSyncDateTime'])),600000000)First, we get the current date/time in ticks by using utcNow():
ticks(utcNow())A tick is a 100-nanosecond interval. By converting a date/time to ticks, we get the number of 100-nanosecond intervals since January 1, 0001 00:00:00 (midnight). By doing this, we can easily calculate the difference between two dates/times. Might sound a bit strange, but a lot of programming languages use ticks.
Then, we subtract the number of ticks for our onPremisesLastSyncDateTime
property, which tells us how many ticks it has been since the last sync:
sub(ticks(utcNow()),ticks(body('Parse_JSON_-_onPremisesLastSyncDateTime')?['onPremisesLastSyncDateTime']))Lastly, because we don’t want the result in ticks but in minutes or hours, we divide the result by 864000000000 so we get the time difference in minutes, or by 36000000000 to get the result in hours.
And there you have it! Now, whenever Azure AD Connect takes over 2h to perform a sync, you will be notified! 😊
No comments:
Post a Comment