
Proper error checking, logging, and alerting are essential for any production script. In terms of alerting, whenever my PowerShell scripts fail to perform a certain task, they send me an email alert with the failure error message. I typically do this through a Try/Catch block: I put whatever I need to make sure gets executed successfully inside the Try statement and, if that fails to run for whatever reason, I use the Send-MgUserMail Microsoft Graph PowerShell SDK cmdlet inside the Catch statement to send me the $_.Exception or $_.Exception.Message information related to the cause of the failure.
When my scripts run on-premises, they also use an on-premises Exchange server to send the email alert if the Send-MgUserMail cmdlet fails. However, not all environments have an on-prem Exchange presence (or a separate non-Microsoft method of sending emails). Furthermore, connectivity to on-prem might not even be an option if the script is running in Azure Automation for example (if not running in Hybrid Worker mode, of course).
For these scenarios, what I tend to do is use either a Power Automate Flow or an Azure Logic App that gets triggered by an HTTP request sent by the script which, in turn, sends the email alert.
One thing to keep in mind with Power Automate is that a
cloud flow that has no successful triggers will expire and be turned off after
90 days of inactivity (the creator and co-owners are notified by email). This
applies when the following licenses are used: 90 days for Free, Trial,
Community, and Microsoft 365 Plans. As such, you might want to consider using either
an Azure Log Apps, or purchasing a standalone Power Automate license to ensure
your flow is not turned off due to inactivity.
Creating the flow
To start, we must first define our trigger. In this case, we
use the When an HTTP request is received trigger which, unfortunately,
is a premium connector:

As you can see from the screenshot below, the URL is only generated once we save the flow, which we will do shortly. First, we need to define the JSON schema, which will tell the trigger what our POST request will include:

The easiest way is to click on Use sample payload to generate schema and provide an example of what we will be sending in our HTTP POST request. For this example, I will be sending the email alert subject and body so the flow can use that data in the email it will be sending. To do this, I provide a sample JSON payload as follows (in the name/value pair, only the name is important here):

As my alerts are always sent only to me, I am not specifying a recipient. However, if you want to use this flow to send emails to different recipients, you can easily add another field for this by regenerating the JSON schema like we just did. Once we click Done, Power Automate generates our body JSON schema for us:

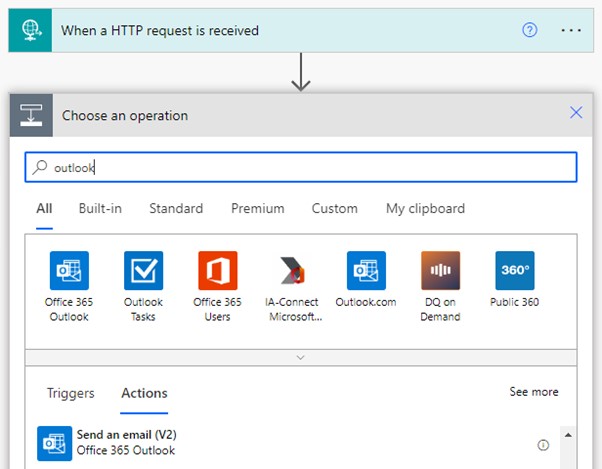
Next, we search for the Send an email (V2) action so we can send our email. Here, I am using Office 365 Outlook connector as I am using Exchange Online in an enterprise environment. You can obviously use any other connector, such as Gmail or Outlook.com for example.
After defining who the email will be sent to, as soon as we click on the Subject field, the popup box on the right comes up and we can immediately see the Subject and Body dynamic outputs from our previous step (our trigger). These “variables”, which we defined in our schema, will contain whatever we send in the HTTP POST request, assuming the request is correct and includes these fields.

We add each one to its correct place, configure any other options we want for our email, like Importance, and we are done:

Once we save our flow, the URL gets generated, and we can retrieve it:

Testing the flow
We are now ready to test our flow. Since it will be
triggered by a normal HTTP POST request, there are many methods we can use. A
very popular one is cURL. Since I primarily use PowerShell, let’s see
how we can trigger this flow using a native PowerShell method. For this, we
have two options (besides the old school .Net objects, like System.Net.WebClient):
Invoke-WebRequest
and Invoke-RestMethod.
Without going into much detail, Invoke-WebRequest is better at
dealing with straight HTML results, while Invoke-RestMethod is much better
at dealing with XML and JSON results (it automatically turns XML/JSON responses
into PowerShell objects for example).
To keep things simple for this test, let’s do the following:
- Save the flow’s URL in a variable called $URL;
- Generate our JSON payload with the email subject and body, and save it in a variable called $postBody. The body supports HTML, so we can highly customise our email;
- Use Invoke-RestMethod to send an HTTP POST request to our flow URL with our JSON payload. It is crucial that you set the ContentType parameter to application/json, otherwise it will not work.

Obviously, you should add error checking for the Invoke-RestMethod call, but I am trying to keep it simple for testing purposes.
If all is working as expected, we should receive the email
with the correct subject and body as per our JSON. If the POST request does not
have the correct fields in the JSON payload, an email will still be sent, but
it will likely be blank, depending on if any of the fields were included in the
request.

As an additional security measure, I like to add another
field to my request, a Secret:

I use this secret like an authentication mechanism: if the
POST request does not provide the correct secret, the flow will either not do
anything, or send me an email saying that someone else is trying to use it.
For this scenario, where the email is only sent to me anyway, this does not bring much benefit. But if emails are sent to other users, you don’t want them to be a victim of a phishing attempt because you did not secure the URL of your flow. Remember that anyone that knows the URL will be able to trigger the flow! Obviously, in this case, they would also need to know the fields being used, but it is always good practice to limit the exposure and reduce the risk.
To do this check, I added a Condition step that
checks if the Secret output from the POST request matches the actual
secret:

In the end, the flow looks like this:

No comments:
Post a Comment