Monday, March 20, 2023
Update-ModuleManifest is not recognized as the name of a cmdlet in Azure Automation
Tuesday, February 15, 2022
Create Calendar Event on all user mailboxes
The other day I was asked by our HR department if it was possible to create a calendar event on all user mailboxes. They didn’t want to send a “normal” meeting invite to dozens of thousands of users that people would have to accept, reject, or ignore. All they wanted was a simple all-day calendar event that would notify users about this particular event.
In my opinion, this has always been one of those features I don’t know why Microsoft never added to Exchange. I can think of so many cases where this would be so useful for so many organisations, but here we are. I remembered reading about something like this a few years back, but it turned out I was thinking about the Remove-CalendarEvents cmdlet introduced in Exchange 2019 and Online. This cmdlet allows admins to cancel future meetings in user or resource mailboxes, which is great when someone leaves the organisation for example.
So that was not an option. I thought about using Exchange
Web Services (EWS). I’ve written quite a few EWS scripts and that was an
option. However, it is all about Graph API nowadays, so that was by far the
best option. But can this be done using Graph API? Of course it can! For that,
we use the Create
Event method:
POST /users/{id | userPrincipalName}/events
POST /users/{id |
userPrincipalName}/calendar/events
POST /users/{id |
userPrincipalName}/calendars/{id}/events
I’ve also written many Graph API scripts and they work
great! However, I’ve had to use lengthy functions to get a token, query Graph
API, etc., which made these scripts long and complex... However, with the Graph
API SDK, this is far from the case! Now it is extremely easy for admins and
developers to write PowerShell Graph API scripts! It is really, really straightforward,
and no need to rely on HTTP Post requests!
Requirements
You will need to have, or create, an app registration in Azure and use a digital certificate for authentication. This link explains how to easily set this up: Use app-only authentication with the Microsoft GraphPowerShell SDK.
The Graph API permissions required for the script to work are 'Calendars.ReadWrite' and 'User.Read.All' (again, if using the -AllUsers switch). Both of type Application.
With the Graph API SDK, you will need the 'Microsoft.Graph.Calendar'
and 'Microsoft.Graph.Users' (if using the -AllUsers switch, more
on this later) modules. For more information on the SDK and how to start using it
with PowerShell, please visit this link.
Script Parameters
-UsersFile
TXT file containing the email addresses or UPNs of the
mailboxes to create a calendar event on.
-ExcludeUsersFile
TXT file containing the email addresses of the mailboxes NOT
to create a calendar event on.
Whenever the script successfully creates an event on a user’s
mailbox, it saves the user’s SMTP/UPN to a file named 'CreateCalendarEvent_Processed.txt'.
This is so the file can be used to re-run the script for any remaining users
(in case of a timeout or any other issues) without the risk of duplicating
calendar entries.
-AllUsers
Creates a calendar event on all Exchange Online mailboxes of
enabled users that have an EmployeeID. This can, and should, be adapted to your
specific environment or requirement.
The script does not use Exchange Online to retrieve the list
of mailboxes. It retrieves all users from Azure AD that have the Mail
and EmployeeID attributes populated.
Script Outputs
- The script prints to the screen any errors, as well as all successful calendar entries created.
- It also generates a log file named ‘CreateCalendarEvent_Log_date
’ with the same information. Whenever it successfully creates an event on a user's mailbox, it outputs the user's SMTP/UPN to a file named ‘CreateCalendarEvent_Processed.txt’. This is so the file can be used to re-run the script for any remaining users (in case of a timeout or any other issues) without the risk of duplicating calendar entries. For any failures when creating a calendar event, the script writes the user's SMTP/UPN to a file named ‘CreateCalendarEvent_Failed.txt’ so admins can easily analyse failures (the same is written to the main log file).
Notes
When using the -AllUsers parameter, the script uses the Get-MgUser cmdlet to retrieve Azure Active Directory user objects. I decided not to use Exchange Online cmdlets to keep things simple and because I wanted only mailboxes linked to users that have an EmployeeID. Obviously, every scenario is going to be different, but it should be easy to adapt the script to your specific requirements.
One thing I found, was that running Get-MgUser against a large number of users (in my case, 25000+ users), PowerShell 5.1 was crashing for no apparent reason. Other users on the internet were having the exact same problem when running for a few thousand users. It turns out PowerShell 5.1 default memory allocation will cause the script to crash when fetching large data sets… The good news is that it works great with PowerShell 7+!
The script is slow... When I ran it for 37000+ users, it
took approximately 1 second per user. Need to look into JSON batching to create multiple events in one single request.
The script will throw errors in an Hybrid environment with mailboxes on-prem (as they are returned by Get-MgUser). If this is your case, you might want to use an Exchange Online cmdlet instead of Get-MgUser (or get all your mailboxes and then use the -UsersFile parameter).
Script
You can get the script on GitHub here.
Examples
C:\PS> .\CreateCalendarEvent.ps1 -AllUsers
This command will:
- Retrieve all users from Azure AD that have the Mail and EmployeeID attributes populated;
- Create a calendar event on their mailboxes. The properties of the calendar event are detailed and configurable within the script.
C:\PS> .\CreateCalendarEvent.ps1 -AllUsers -ExcludeUsersFile .\CreateCalendarEvent_Processed.txt
This command will:
- Retrieve all users from Azure AD that have the Mail and EmployeeID attributes populated;
- Create a calendar event on their mailboxes, unless they are in the 'CreateCalendarEvent_Processed.txt' file.
Friday, October 1, 2021
Unlimited Exchange Online Archiving is no longer Unlimited
TLDR: Microsoft has added size restrictions to Unlimited Archiving (aka Auto-Expanding Archiving). The change will take effect beginning November 1, 2021. Once this limit takes effect, users will not be able to extend their online archives beyond 1.5TB.
Upcoming Changes to Auto-Expanding Archive
MC288051 · Published 29 Sept 2021 ·
Last updated 30 Sept 2021
Message Summary
Updated September 30, 2021: We have
updated the content below for additional clarity. Thank you for your patience.
We will be removing the word ‘Unlimited’
from our service description and related public documentation for the
auto-expanding archiving feature, and instituting a 1.5TB limit for archive
mailboxes. This limit is not configurable.
Key points
- Timing:
This change will take effect beginning November 1, 2021 and is applicable
to all environments.
- Roll-out:
tenant level
- Action:
review and assess
How this will affect your organization
Once this limit takes effect, your
users will not be able to extend their online archives beyond 1.5TB. As
currently noted in our documentation, auto-expanding archive is only supported
for mailboxes used for individual users or shared mailboxes with a growth rate
that does not exceed 1 GB per day. Using journaling, transport rules, or
auto-forwarding rules to copy messages to Exchange Online Archiving for the
purposes of archiving is not permitted. A user's archive mailbox is intended
for just that user. Microsoft reserves the right to deny auto-expanding
archiving in instances where a user's archive mailbox is used to store archive
data for other users or in other cases of inappropriate use.
If you have previously worked with
Microsoft Support to provide exceptions for existing archives exceeding 1.5TB,
those specific archives will not be affected by this change. You will not,
however, be able to create any new archives that exceed 1.5TB.
What you need to do to prepare
You should check the size of
archives in your organization if you are concerned that they might be close to
the limit and consider deleting some of the content if you intend to continue
adding to the archive. You can use Get-MailboxFolderStatistics to view
archive mailbox size.
Wednesday, July 8, 2020
Exchange Online PowerShell Scripts with Modern Auth
Auditing and reporting scenarios in Exchange Online often involve scripts that run unattended. In most cases, these unattended scripts access Exchange Online PowerShell using Basic Authentication (username and password). However, basic authentication for Exchange Online Remote PowerShell will be retired in the second half of 2021. As an alternative method, Microsoft has recently announced the Public Preview of a Modern Authentication unattended scripting option. As such, if you currently use Exchange Online PowerShell cmdlets in unattended scripts, you should look into adopting this new feature. This new approach uses Azure AD applications, certificates and Modern Authentication to run non-interactive scripts!
How does it work?
The EXO V2 module uses the Active Directory Authentication Library to fetch an app-only token using the Application ID, Azure Tenant ID, and a digital certificate thumbprint. The application object provisioned inside Azure AD has a Directory Role assigned to it (like Exchange Administrator), which is returned in the access token. Exchange Online then configures the session RBAC using the directory role information that is available in the token.
Configuring app-only authentication
This feature is still in Public Preview and requires version 2.0.3-Preview or later of the EXO PowerShell v2 module (available via PowerShellGallery).
To install the Preview release of the EXO v2 module, run the
following command:
Install-Module -Name ExchangeOnlineManagement -RequiredVersion 2.0.3-Preview -AllowPrerelease
If already installed, you can update an earlier version of
the of the EXO v2 module by running the following command:
Update-Module -Name ExchangeOnlineManagement -AllowPrerelease
Step 1: Application registration in Azure AD
- Go
to the Azure AD portal at https://portal.azure.com/
and sign in with your Azure AD account;
- Under
Manage Azure Active Directory, click View;
- Under
Manage, select App registrations and then click New
registration;
- In
the Register an application page that appears, configure the
following settings:
- Name:
Enter something descriptive.
- Supported
account types: select Accounts in this organizational directory
only (Microsoft).
- When
you are finished, click Register;
- In
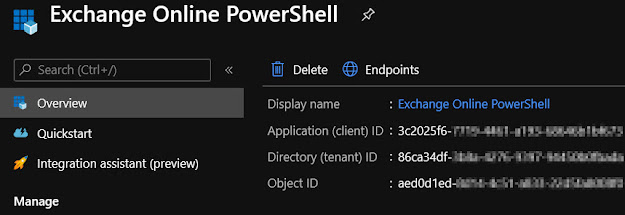
my case, I called it Exchange Online PowerShell:
Step 2: Assign API permissions to the application
Next, we need to assign it permissions to manage Exchange
Online as an app. An application object has the default permission User.Read.
For the application object to access Exchange Online resources, it needs to
have the application permission Exchange.ManageAsApp. API permissions
are required because they have consent flow enabled, which allows auditing
(directory roles do not have consent flow).
- Select
API permissions;
- In
the Configured permissions page that appears, click Add
permission;
- In the flyout that appears, scroll down to Supported legacy APIs and select Exchange:
- In
the flyout that appears, click Application permissions;
- In the Select permissions section, expand Exchange and select Exchange.ManageAsApp and then Add permissions:
- Back
on the Configured permissions page, click Grant admin consent
for “tenant name” and select Yes in the dialog that appears.
Ensure the permissions have been granted (green tick):
Step 3: Generate a self-signed certificate
There are multiple ways to create a self-signed X.509
certificate. You can use the Create-SelfSignedCertificate
script or the makecert.exe tool from the Windows SDK for example. Personally,
I found the easiest way to be the New-SelfSignedCertificate
PowerShell cmdlet. The following example creates a self-signed certificate and
places it in my personal certificate store:
New-SelfSignedCertificate -Subject “ExO-PS-Nuno” -KeyExportPolicy
“Exportable” -CertStoreLocation cert:\CurrentUser\My -Provider “Microsoft
Enhanced RSA and AES Cryptographic Provider”
While we are here, take note of the certificate’s thumbprint as we will need it in the final step.
It might be obvious, but I should mention that the certificate has to be installed on the user certificate store of the computer where you want to connect to Exchange Online from.
Next, export the certificate using the format .CER (we will need it in the next step):
Step 4: Attach the certificate to the Azure AD
application
- In
the Azure AD portal under Manage Azure Active Directory, click View;
- Under
Manage, select App registrations;
- On
the App registrations page that appears, select your application;
- Under
Manage, select Certificates & secrets;
- On the Certificates & secrets page, click Upload certificate:
- In
the dialog that appears, browse to the self-signed certificate you created
in the previous step, and then click Add:
- The
certificate is then uploaded and added to the application:
Step 5: Assign a role to the application
One thing to note with this method is the lack of RBAC
controls. We simply cannot take advantage of the granular controls Exchange
offers with RBAC... Instead, what the service principal can and cannot do is
determined by the role it is assigned in the Azure AD portal. We can play with
the roles and actions assigned to these role groups, but those changes will
obviously affect anyone assigned the same role.
Azure AD has more than 50 admin roles available. For
app-only authentication in Exchange Online, the following roles are currently
supported:
- Global
administrator
- Compliance
administrator
- Security
reader
- Security
administrator
- Helpdesk
administrator
- Exchange
administrator
- Global
Reader
- In
the Azure AD portal under Manage Azure Active Directory, click View;
- Under
Manage, select Roles and administrators;
- Select
one of the supported roles. On the Assignments page that appears,
click Add assignments;
- In
the Add assignments flyout, find and select the application, and
then click Add:
- Our application now has Exchange administrator rights:
Step 6: Connect to Exchange Online PowerShell
The final step is to connect using our certificate’s
thumbprint. To do this, we run the following cmdlet:
Connect-ExchangeOnline -CertificateThumbPrint “EAB240A72B05FBC980D1259FD21AE099D530F4AF”
-AppID “3c2025f6-xxxx-xxxx-xxxx-xxxxxxxxxxxx” -Organization “xxxxxx.onmicrosoft.com”
And there you go! 😊
If you don’t want to install the certificate, you can actually connect using the local .pfx certificate instead:
Connect-ExchangeOnline -CertificateFilePath “C:\Users\nuno\Documents\Exo-PS-Nuno.pfx” -AppID “3c2025f6-xxxx-xxxx-xxxx-xxxxxxxxxxxx” -Organization “xxxxxx.onmicrosoft.com”
Important Considerations
As any other action performed in Exchange Online, any
changes we do via this new method still results in them being captured in the
Admin audit log and, in turn, in the Unified Audit log in Office 365. A
downside I should highlight, is that any actions performed using this method
will list the application as the user performing the action. As such, it might
be a good idea for any admin to have their own application so that actions can
be correctly audited and tracked.
Another important thing to keep in mind when using this new method, is that its authenticating flow against Azure AD is not subject to Conditional Access policies and MFA enforcement. While this can be great as it allows us to enable automation, you must take extra care to secure your app details and certificate’s private key, as anyone who gets their hands on them can easily reuse them from anywhere...
Restoring Deleted Items from Exchange as an Admin
The Get/Restore-RecoverableItems
PowerShell cmdlets have been available for some time now in Exchange Server
2016/2019 and Exchange Online environments. These allow admins to restore
deleted items from user mailboxes such as in the following example:
Restore-RecoverableItems
nuno@domain.com -FilterItemType IPM.Note -SubjectContains “New Joiner – John
Doe” -FilterStartTime “20/06/2020 12:00:00 AM” -FilterEndTime “21/06/2020
11:59:59 PM”
Items are restored to the original folder location if the information is available for the item. If the information cannot be found, the item is restored to the default folder for the item type (Inbox for messages, Calendar for meetings and appointments, and so on).
What this post is mainly about, however, is the fact that admins can now do the same from the preview version of Exchange Admin Center (with the new UI)!
Important: please note that in order to use these cmdlets and the method described below, you need to be assigned the Mailbox Import / Export permission which, by default, no one is assigned.
To get started, go to the Exchange Admin Center and click on
Try it now to access the preview version:
Alternatively, you can use the following link to get to it directly: https://admin.exchange.microsoft.com/#/mailboxes
Next, select the user you want to recover deleted items for and then look for the Recover deleted items link on the user property page:
The new Recover deleted items UI will show up and automatically list the latest 50 recoverable items:
We can easily search for the items we are interested in by subject, type, or folder type:
After clicking Apply filter, our results are reduced to recoverable items containing the subject line “azure” which were deleted within the past 30 days. Once we find the item(s) we want to recover, we simply select it/them and click on Recover deleted items:
Once recovered, a green banner will appear indicating all items have been successfully recovered:
All done! 😊
Friday, June 26, 2020
How to set OWA Language and Time zone using PowerShell
When a user first logs on to Outlook Web
App (OWA), he/she gets prompted to set their language and time zone:
Can we, as administrators, pre-set these
for users or change them after they have been set, for example? Of course! To
do this, we use the Get/Set-MailboxRegionalConfiguration cmdlet:
The two parameters we are interested for this scenario are:
- Language: specifies the language setting, such as en-us, that would apply for the mailbox;
- TimeZone: specifies the time zone, such as Pacific Standard Time, that the mailbox in the specified region uses. The default value is the time zone setting on the server.
Let us say, for example, that we want to set everyone’s mailbox to American English and Pacific time. To do this, all we need to run is:
Get-Mailbox –ResultSize Unlimited –Filter {RecipientTypeDetails –eq "UserMailbox"} | Set-MailboxRegionalConfiguration –Language en-US –TimeZone "Pacific Standard
Time"
How to Change Exchange EAC Language
When we first login to the Exchange Admin
Center (EAC), we are greeted with the language selection
screen and time zone. But how do we change EAC’s language after that? The
answer is to use Outlook Web App (OWA). Once you have logged into OWA, select
the cog icon in the top right hand corner and then click Options:
Next, go to settings in the options
menu, and on the right hand menu select regional. Now edit the language
and time zone settings to what you want as these settings also apply to the
EAC:
But what about for environments where
administrators do not have mailboxes? How do they change EAC’s language if they
do not have access to OWA? In this case, you can specify the language you want
to use in the URL itself. For example, for American English, add ?mkt=EN-us
to the EAC’s URL: https://mail.domain.com/ecp?mkt=EN-us
This works for both on-premises Exchange 2013 and above, and Office 365.
Wednesday, June 24, 2020
RecipientNotFoundPermanentException when migrating a mailbox to Exchange Online
The other when migrating a mailbox from an on-prem Exchange
2013 environment to Exchange Online, I was faced with a RecipientNotFoundPermanentException
error with the message “Error: Cannot find a recipient that has mailbox GUID
'39c970e4-4869-47ee-b9af-f6fd6264ee0a'.”
These were the details for the mail user in Exchange Online
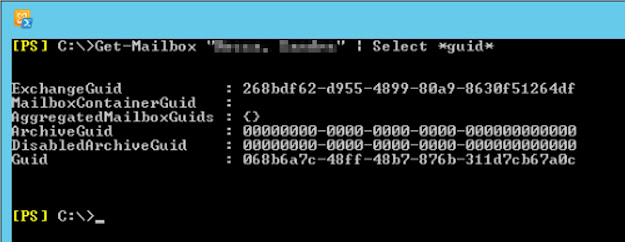
(notice the ExchangeGuid attribute):

As you can see, the ExchangeGUID was the same! And
where was that '39c970e4-4869-47ee-b9af-f6fd6264ee0a' GUID coming from?!
After much troubleshooting, I ended up logging a support ticket with Microsoft. According to the engineer, “this issue is caused due to multiple mailbox shards”. Unfortunately, he wouldn’t go into details as apparently it is all secret stuff... But he ran some diagnostics to resolve the issue, and after a few minutes all was well with the world again!
Block emails delivered directly to user@domain.onmicrosoft.com or user@domain.mail.onmicrosoft.com (MX Bypass)
Let’s assume I have my mailbox in Exchange Online with an email address of nuno@domain.com. External users can send emails directly to nuno@domain.onmicrosft.com (the tenant’s default domain) or to nuno@domain.mail.onmicrosoft.com (typically used in Hybrid environments) and they will be delivered to my mailbox. This is because these two managed domains are fully managed by Microsoft and have internet-routable MX records:
Not a big problem for “pure” Office 365 organizations as these emails are still subject to Exchange Online Protection (EOP) policies such as anti-spam and anti-malware. However, this is a problem for organizations that use a 3rd-party service for message hygiene. In this scenario, these emails would completely bypass the 3rd-party and all the security measures it enforces.
There are a few solutions out there that rely on mail flow (transport) rules to either reject or redirect these emails back to the 3rd-party provider, but these never quite worked for me... The main reason is that transport rules are processed post onresolveMessage event and when this happens the email address for the recipient changes to the PrimarySMTPAddress which has the domain.com suffix.
The solution I ended up implementing was slightly different. I created an Inbound Partner Connector, set the sender domain address space to *, and restricted it to only accept emails if the sender presents the certificate I have configured on my on-prem Hybrid servers (you can also restrict it to your on-prem or 3rd-party IP addresses). The following procedure assumes that we have a setup in which we have executed the Hybrid Configuration Wizard (HCW) successfully (which would have created the required connectors for mail flow).
First, we run the following command to get a list of inbound connectors configured by HCW. If you have Hybrid across multiple Exchange Organizations, then you’ll see more than one entry.
$onpremorg = Get-OnPremisesOrganization | Select OrganizationGuid,
InboundConnector | Where {$_.InboundConnector -ne $null}
$onpremorg
If the Inbound Connector was configured by the HCW, then the attribute TlsSenderCertificateName will map either to the domain name included in the subject or subject alternate name attribute of the 3rd-party certificate used, or it will contain the details of the certificate.
Next, we create the inbound partner connector using the following command:
New-InboundConnector -Name “Block Direct Delivery”
-ConnectorType Partner -SenderDomains * -TlsSenderCertificateName
(Get-InboundConnector $onpremorg[0].InboundConnector).TlsSenderCertificateName
-RestrictDomainsToCertificate $True -RequireTls $True
Once this connector is in place, any external senders that try to email nuno@domain.onmicrosft.com or nuno@domain.mail.onmicrosoft.com will receive the following NDR:
Emails sent to Exchange Online mailboxes routed through the on-prem Exchange servers, will always use the Inbound connector created by the HCW, while service emails like notifications from Teams, SharePoint Online, etc., will use the default connectors.
If you use a 3rd-party service for message hygiene but your emails flow directly from the 3rd-party to Exchange Online, you can still use this method, but instead of restricting the connector to a certificate using the RestrictDomainsToCertificate parameter, you can restrict it to the IP(s) of your 3rd-party service by using the RestrictDomainsToIPAddresses parameter.
Sunday, March 1, 2020
Exchange Online Meeting Room Statistics - Graph API
IMPORTANT:
- To analyze a particular meeting room, specify one or more primary SMTP addresses in the format: "room1@domain.com, room2@domain.com". Alternatively, analyze all meeting rooms by using the "-All" switch;
- You will need to have, or create, an 'app registration' in Azure and user digital certificate for authentication (you can update the script to use 'client secret' instead);
- The app registration will need the following API permissions to Graph API: 'User.Read.All', 'Calendars.Read', and 'Place.Read.All', all of type 'Application';
- Maximum range to search is 1825 days (5 years);
- You can enter the dates in the format "22/02/2020", "22/02/2020 15:00", or in ISO 8601 format such as "2020-02-22T15:00:00", or even "2020-02-22T15:00:00-08:00" to specify an offset to UTC (time zone).
The most basic way of running the script is as follows (more examples in the script itself):
.\Get-MeetingRoomStats_GraphAPI.ps1 -All -From "01/01/2020" -To "01/02/2020"
The script gathers and exports the following stats for each meeting room for the given date range:
- RoomName: the display name of the meeting room (when using -All). When using -RoomListSMTP, this will be the room's SMTP address;
- RoomSMTP: the SMTP address of the meeting room;
- From: the start of the date range to search the calendar;
- To: the end of the date range to search the calendar;
- totalMeetings: the total number of meetings;
- totalDuration: the total number of minutes for all meetings;
- totalAttendees: the total number of attendees invited across all meetings;
- totalUniqueOrganizers: the number of unique meeting organizers;
- totalUniqueAttendees: the number of unique attendees;
- totalReqAttendees: the total number of required attendees;
- totalOptAttendees: the total number of optional attendees;
- Top5Organizers: the email address of the top 5 meeting organizers, and how many meetings each scheduled;
- Top5Attendees: the email address of the top 5 meeting attendees, and how many meetings each attended;
- totalAllDay: the total number of 'all-day' meetings;
- totalAM: the total number of meetings that started in the morning (this excludes all-day meetings);
- totalPM: the total number of meetings that started in the afternoon;
- totalRecurring: the total number of recurring meetings;
- totalSingle: the total number of non-recurring meetings (single instance/occurrence).
Sunday, September 15, 2019
MapiExceptionMessagePerFolderCountQuotaExceeded
Error: QuotaExceededException/MapiExceptionMessagePerFolderCountQuotaExceeded: Error: Cannot save changes made to an item to store. --> MapiExceptionMessagePerFolderCountQuotaExceeded: Unable to save changes.
Get-MailboxFolderStatistics "user" | % {If ($_.ItemsInFolder -ge 1000000) {Write-Host "Folder with $("{0:N0}" -f $($_.ItemsInFolder)) items: '$($_.FolderPath)'" -ForegroundColor Red}}
Hope it helps!
Sunday, March 31, 2019
The onboarding move could not be created because user is already being moved
PS C:\> Get-MigrationUser user@domain.com | FL
Identity : user@domain.com
BatchId : Pilot Migration 1
MailboxEmailAddress : user@domain.com
RecipientType : MailboxOrMailuser
Status : Failed
StatusSummary : Failed
MigrationType : ExchangeRemoteMove
State : Failed
WorkflowStep : DataMigration
WorkflowStage : Injection
ErrorSummary : The onboarding move could not be created because user 'User' is already being moved.
- msExchMailboxMoveBatchName
- msExchMailboxMoveFlags
- msExchMailboxMoveRemoteHostName
- msExchMailboxMoveSourceMDBLink
- msExchMailboxMoveStatus
- msExchMailboxMoveTargetMDBLink