Showing posts with label Exchange 2010. Show all posts

Friday, June 26, 2020

Exchange LUN disappeared after reboot

After rebooting an Exchange 2013 server to complete the installation of a security update, 2 LUNs just disappeared:


Looking in Disk Management their Status was Failed:


The LUNs were offline, and after manually bringing them online everything was back to normal.

There had been some previous work done on these LUNs in order to expand them and, for some reason, the default Windows policy to make SAN disks offline was applied (it assumes VMware disks are SAN disks).

After changing the policy to make “new” disks online by default, the issue didn’t happen again:

Sunday, October 15, 2017

Exchange Mailbox Move History

A common task amongst many Exchange administrators around the world is moving users’ mailboxes between databases. This could be to move the user to a database with a higher quota limit, because the user moved to a different location so we want to move his mailbox to an Exchange server closer to his new location, simply because of an Exchange transition/migration, or for many other reasons.


Whatever the case might be, Exchange keeps track of these mailbox moves in case we need to find out, for example, where a mailbox was located before. To access this information, we need to run the Get-MailboxStatistics cmdlet against the mailbox we want to check and use the IncludeMoveHistory switch, such as follows (some output has been removed for brevity):
Get-MailboxStatistics nuno –IncludeMoveHistory | FL
or
(Get-MailboxStatistics nuno –IncludeMoveHistory).MoveHistory

Status                           : Completed
Flags                            : IntraOrg, Pull
SourceDatabase                   : MDB2
SourceVersion                    : Version 14.3 (Build 224.0)
SourceServer                     : server2.nunomota.pt
SourceArchiveDatabase            :
SourceArchiveVersion             : Version 0.0 (Build 0.0)
SourceArchiveServer              :
TargetDatabase                   : MDB01
TargetVersion                    : Version 15.0 (Build 1076.0)
TargetServer                     : server1.nunomota.pt
TargetArchiveDatabase            :
TargetArchiveVersion             : Version 0.0 (Build 0.0)
TargetArchiveServer              :
BadItemLimit                     : 0
BadItemsEncountered              : 0
LargeItemLimit                   : 0
LargeItemsEncountered            : 0
QueuedTimestamp                  : 6/18/2017 12:51:20 PM
StartTimestamp                   : 6/18/2017 12:51:26 PM
FinalSyncTimestamp               : 6/18/2017 12:52:17 PM
CompletionTimestamp              : 6/18/2017 12:55:16 PM
OverallDuration                  : 00:03:55.2744307
TotalFinalizationDuration        : 00:02:57.7932767
TotalSuspendedDuration           : 00:00:00
TotalFailedDuration              : 00:00:00
TotalQueuedDuration              : 00:00:00.7499765
TotalInProgressDuration          : 00:03:54.5244542
TotalStalledDueToHADuration      : 00:00:00
TotalTransientFailureDuration    : 00:00:00
MRSServerName                    : server2.nunomota.pt
TotalMailboxSize                 : 51.25 MB (53,742,458 bytes)
TotalMailboxItemCount            : 669
Message                          :
FailureTimestamp                 :
Report                           :


“The IncludeMoveHistory switch specifies whether to return additional information about the mailbox that includes the history of a completed move request, such as status, flags, target database, bad items, start times, end times, duration that the move request was in various stages, and failure codes.”


The number of moves that are kept in Exchange will depend what version of Exchange you are running. For Exchange 2010 the default value is 2 while for 2013 it is 5. However, this number can be customized by editing the Mailbox Replication Service (MRS) configuration. To do this, open the MsExchangeMailboxReplication.exe.config file, which by default is located at C:\Program Files\Microsoft\Exchange Server\V15\Bin, using Notepad with Admin rights. Then, go to the MRSConfiguration section and update the MaxMoveHistoryLength setting with a value between 0 and 100.


To get a higher level of detail, we can instead use the IncludeMoveReport switch. This switch specifies whether to return a verbose detailed move report for a completed move request, such as server connections and move stages.

Monday, May 15, 2017

Exchange Meeting Room Statistics

A while back I wrote an article named Exchange Meeting Room Statistics about a script to gather statistics regarding Exchange meeting room usage for MSExchange.org. For this script to work, we have to give ourselves FullAccess to the meeting rooms’ mailbox, add them into our Outlook profile, and then use an Outlook COM Object to connect to Outlook and gather this information. Far from ideal, especially when trying to analyse dozens of rooms!

I have finally written a new version that uses Exchange Web Services to gather the same information, plus some further stats. All the script requires is for AutoDiscover to be working, the EWS Managed API to be installed, and for the user running the script to have Reviewer permissions to the meeting rooms’ calendar (FullAccess permissions to the room’s mailbox will also work).

UPDATE (15/12/2017): I have updated the script to also work with Exchange Online (Office 365). If you want to analyse meeting rooms in EXO, simply add the -ExchangeOnline switch when running the script.

UPDATE (March/2020): I have finally written this newer version, specifically targeted at Exchange Online only, this time using Graph API! Please check it here.

This new EWS script, available in GitHub, will gather statistics such as the number of meetings during the specified times, the total and average meeting duration (in minutes), the total and average number of attendees, how many meetings started in the morning and afternoon, how many recurring meetings, and the 5 five organizers and attendees. It will export all the stats to a CSV file and also print in on the screen:
PS C:\Scripts\> .\Get-MeetingRoomStats.ps1 -RoomListSMTP "room.1@domain.com, room.2@domain.com" -From "03/01/2017" -To "04/01/2017"

From         : 01/Mar/17 0:00:00
To           : 01/Apr/17 0:00:00
RoomEmail    : room.1@domain.com
RoomName     : IT - 16 Floor - Room 16.23
Meetings     : 104
Duration     : 4920
AvgDuration  : 47
TotAttendees : 442
AvgAttendees : 4
RecAttendees : 383
OptAttendees : 59
AMtotal      : 46
AMperc       : 44
PMtotal      : 58
PMperc       : 56
RecTotal     : 38
RecPerc      : 37
TopOrg       : user.1@domain.com (12), user.2@domain.com (9), user.3@domain.com (9), user.4@domain.com (7), user.5@domain.com (5), user.6@domain.com
(4), user.7@domain.com (4), user.8@domain.com (4), user.9@domain.com (4), user.10@domain.com (3),
TopAtt       : user.2@domain.com (25), user.4@domain.com (23), user.1@domain.com (19), user.3@domain.com (16), user.11@domain.com (16),
user.12@domain.com (15), user.9@domain.com (12), user.13@domain.com (11), user.14@domain.com (9), user.15@domain.com (9),


From         : 01/Mar/17 0:00:00
To           : 01/Apr/17 0:00:00
RoomEmail    : room.2@domain.com
RoomName     : IT - 16 Floor - Room 16.24
Meetings     : 121
Duration     : 6178
AvgDuration  : 51
TotAttendees : 570
AvgAttendees : 5
RecAttendees : 537
OptAttendees : 33
AMtotal      : 45
AMperc       : 37
PMtotal      : 76
PMperc       : 63
RecTotal     : 42
RecPerc      : 35
TopOrg       : user.16@domain.com (9), user.17@domain.com (8), user.10@domain.com (8), user.18@domain.com (7), user.19@domain.com (6),
user.20@domain.com (5), user.21@domain.com (5), user.22@domain.com (4), user.6@domain.com (4), user.23@domain.com (4),
TopAtt       : user.24@domain.com (22), user.4@domain.com (20), user.17@domain.com (17), user.25@domain.com (16), user.16@domain.com (15),
user.11@domain.com (12), user.26@domain.com (12), user.21@domain.com (12), user.27@domain.com (11), user.28@domain.com (11),

You can download the script from here.

Sunday, April 9, 2017

How to Check Exchange Prepare AD Values

Before installing a new Exchange environment, and sometimes when updating to a newer Cumulative Update, we need to prepare our Active Directory (AD) forest and its domains. Exchange needs to prepare AD so that it can store information about users' mailboxes and the configuration of Exchange servers in the organization.

Once we have extended the AD Schema, prepared AD, and prepared all its domains, several properties are updated to show that preparation is complete. At this stage, it is strongly recommended to make sure everything has gone smoothly. To do so, typically a tool called Active Directory Service Interfaces Editor (ADSI Edit) is used to check these properties have been updated to the value they should have. Each property needs to match the value for the release of Exchange that we are installing:
  • “In the Schema naming context, verify that the rangeUpper property on ms-Exch-Schema-Verision-Pt is set to the value shown for your version of Exchange 2016 in the Exchange 2016 Active Directory versions table;
  • In the Default naming context, verify that the objectVersion property in the Microsoft Exchange System Objects container under DC=root domain is set to the value shown for your version of Exchange 2016 in the Exchange 2016 Active Directory versions table;
  • In the Configuration naming context, verify that the objectVersion property in the CN=your organization,CN=Microsoft Exchange,CN=Services,CN=Configuration,DC=domain container is set to the value shown for your version of Exchange 2016 in the Exchange 2016 Active Directory versions table.”
 
 
But there are other methods. For example, Michel de Rooij has blogged about checking these properties using LDAP and PowerShell in his Exchange Schema Versions blog post. Additionally, we can use the LDP.exe tool (an LDAP client GUI), or we can use DSQuery.
 
Dsquery is a command-line tool that is built into Windows Server when the Active Directory Domain Services (AD DS) server role or the AD DS admin tools are installed. Using dsquery we can query AD (shocker!) by using search criteria that we specify.
 
So, let’s say we want to check the value of the rangeUpper property using dsquery. We can easily do this by running the following command:
DSQUERY.exe * “CN=ms-Exch-Schema-Version-Pt,CN=schema,CN=configuration,DC=domain,DC=com” -Scope base -Attr rangeUpper

In my lab, where I have a nunomota.pt domain, I would run:
DSQUERY.exe * “CN=ms-Exch-Schema-Version-Pt,CN=schema,CN=configuration,DC=nunomota,DC=pt” -Scope base -Attr rangeUpper

To check for the other two properties, we would use the following two queries:
DSQUERY.exe * “CN=Exchange_Org_Name,CN=Microsoft Exchange,CN=Services,CN=Configuration,DC=domain,DC=com” -Scope base -Attr objectVersion

DSQUERY.exe * “CN=Exchange_Org_Name,CN=Microsoft Exchange,CN=Services,CN=Configuration,DC=domain,DC=com” -Scope base -Attr msExchProductId

Now that we know how to easily check these properties, we can make it even easier by automating the check with the script below. In order to automate this, I use the Get-OrganizationConfig Exchange cmdlet to determine the Exchange Organization Name (when it is not specified), so the Exchange Management Shell (EMS) should be used. This means that if we run the script from a normal PowerShell console and do not specify the Exchange Org Name, the script throws an error:
 
 
Obviously, if this is a brand-new Exchange environment, the EMS will not yet be available at this stage. In these cases, we must specify the Exchange Org Name and the script will not use the Get-OrganizationConfig cmdlet:
 
 
From the values presented by the script, and by looking at the Exchange 2016 Active Directory versions table, we can see that this Exchange Environment is running Exchange 2016 CU3.
 
The following is the script that produced the output above:
[CmdletBinding()]
Param (
 [Parameter(Position = 0, Mandatory = $True)]
 [ValidateNotNullOrEmpty()]
 [String] $Domain,

 [Parameter(Position = 1, Mandatory = $False)]
 [String] $ExOrgName = (Get-OrganizationConfig).ID
)


If ($Domain -notmatch "\.") {Write-Host "Please enter a correct Domain name." -ForegroundColor Red; Exit}
ForEach ($name in $Domain.Split(".")) {$tempDomain += ",DC=$($name)"}

$rangeUpper = (DSQUERY.exe * “CN=ms-Exch-Schema-Version-Pt,CN=schema,CN=configuration$($tempDomain)” -Scope base -Attr rangeUpper)[1].Trim()
$objectVersionDNC = (DSQUERY.exe * “CN=Microsoft Exchange System Objects$($tempDomain)” -Scope base -Attr objectVersion)[1].Trim()
$objectVersionCNC = (DSQUERY.exe * “CN=$ExOrgName,CN=Microsoft Exchange,CN=Services,CN=Configuration$($tempDomain)” -Scope base -Attr objectVersion)[1].Trim()
$msExchProductId = (DSQUERY.exe * “CN=$ExOrgName,CN=Microsoft Exchange,CN=Services,CN=Configuration$($tempDomain)” -Scope base -Attr msExchProductId)[1].Trim()

Write-Host "rangeUpper (Schema)           :", $rangeUpper
Write-Host "objectVersion (Default)       :", $objectVersionDNC
Write-Host "objectVersion (Configuration) :", $objectVersionCNC
Write-Host "msExchProductId               :", $msExchProductId


We could take this script one step further and build a list of all these properties and their values for each Exchange CU, and then print which ones match. Because some CUs do not update all these properties, sometimes they will match more than one Exchange version:
 
[CmdletBinding()]
Param (
 [Parameter(Position = 0, Mandatory = $True)]
 [ValidateNotNullOrEmpty()]
 [String] $Domain,

 [Parameter(Position = 1, Mandatory = $False)]
 [String] $ExOrgName = (Get-OrganizationConfig).ID
)


If ($Domain -notmatch "\.") {Write-Host "Please enter a correct Domain name." -ForegroundColor Red; Exit}
ForEach ($name in $Domain.Split(".")) {$tempDomain += ",DC=$($name)"}


$rangeUpperHash = @{}
$rangeUpperHash.Add("Exchange 2016 CU3 and CU4", "15326")
$rangeUpperHash.Add("Exchange 2016 CU2", "15325")
$rangeUpperHash.Add("Exchange 2016 CU1", "15323")
$rangeUpperHash.Add("Exchange 2016 Beta and RTM", "15317")
$rangeUpperHash.Add("Exchange 2013 CU7 and later", "15312")
$rangeUpperHash.Add("Exchange 2013 CU6", "15303")
$rangeUpperHash.Add("Exchange 2013 CU5", "15300")
$rangeUpperHash.Add("Exchange 2013 SP1", "15292")
$rangeUpperHash.Add("Exchange 2013 CU3", "15283")
$rangeUpperHash.Add("Exchange 2013 CU2", "15254")
$rangeUpperHash.Add("Exchange 2013 CU1", "15254")
$rangeUpperHash.Add("Exchange 2013 RTM", "15137")

$objVerDNCHash = @{}
$objVerDNCHash.Add("Exchange 2016 Beta to CU4", "13236")
$objVerDNCHash.Add("Exchange 2013 RTM to CU10", "13236")

$objVerCNCHash = @{}
$objVerCNCHash.Add("Exchange 2016 CU4", "16213")
$objVerCNCHash.Add("Exchange 2016 CU2 and CU3", "16212")
$objVerCNCHash.Add("Exchange 2016 CU1", "16211")
$objVerCNCHash.Add("Exchange 2016 RTM", "16210")
$objVerCNCHash.Add("Exchange 2016 Beta", "16041")
$objVerCNCHash.Add("Exchange 2013 CU10 and later", "16130")
$objVerCNCHash.Add("Exchange 2013 CU6 to CU9", "15965")
$objVerCNCHash.Add("Exchange 2013 CU5", "15870")
$objVerCNCHash.Add("Exchange 2013 SP1", "15844")
$objVerCNCHash.Add("Exchange 2013 CU3", "15763")
$objVerCNCHash.Add("Exchange 2013 CU2", "15688")
$objVerCNCHash.Add("Exchange 2013 CU1", "15614")
$objVerCNCHash.Add("Exchange 2013 RTM", "15449")

$msExchProductIdHash = @{}
$msExchProductIdHash.Add("Exchange 2016 CU5", "15.01.0845.032")
$msExchProductIdHash.Add("Exchange 2016 CU4", "15.01.0669.032")
$msExchProductIdHash.Add("Exchange 2016 CU3", "15.01.0544.027")
$msExchProductIdHash.Add("Exchange 2016 CU2", "15.01.0466.034")
$msExchProductIdHash.Add("Exchange 2016 CU1", "15.01.0396.030")
$msExchProductIdHash.Add("Exchange 2016 RTM", "15.01.0225.042")
$msExchProductIdHash.Add("Exchange 2016 Beta", "15.01.0225.017")
$msExchProductIdHash.Add("Exchange 2013 CU15", "15.00.1263.005")
$msExchProductIdHash.Add("Exchange 2013 CU14", "15.00.1236.003")
$msExchProductIdHash.Add("Exchange 2013 CU13", "15.00.1210.003")
$msExchProductIdHash.Add("Exchange 2013 CU12", "15.00.1178.004")
$msExchProductIdHash.Add("Exchange 2013 CU11", "15.00.1156.006")
$msExchProductIdHash.Add("Exchange 2013 CU10", "15.00.1130.007")
$msExchProductIdHash.Add("Exchange 2013 CU9", "15.00.1104.005")
$msExchProductIdHash.Add("Exchange 2013 CU8", "15.00.1076.009")
$msExchProductIdHash.Add("Exchange 2013 CU7", "15.00.1044.025")
$msExchProductIdHash.Add("Exchange 2013 CU6", "15.00.0995.029")
$msExchProductIdHash.Add("Exchange 2013 CU5", "15.00.0913.022")
$msExchProductIdHash.Add("Exchange 2013 SP1", "15.00.0847.032")
$msExchProductIdHash.Add("Exchange 2013 CU3", "15.00.0775.038")
$msExchProductIdHash.Add("Exchange 2013 CU2", "15.00.0712.024")
$msExchProductIdHash.Add("Exchange 2013 CU1", "15.00.0620.029")
$msExchProductIdHash.Add("Exchange 2013 RTM", "15.00.0516.032")


$rangeUpper = (DSQUERY.exe * "CN=ms-Exch-Schema-Version-Pt,CN=schema,CN=configuration$($tempDomain)" -Scope base -Attr rangeUpper)[1].Trim()
$objVerDNC = (DSQUERY.exe * "CN=Microsoft Exchange System Objects$($tempDomain)" -Scope base -Attr objectVersion)[1].Trim()
$objVerCNC = (DSQUERY.exe * "CN=$ExOrgName,CN=Microsoft Exchange,CN=Services,CN=Configuration$($tempDomain)" -Scope base -Attr objectVersion)[1].Trim()
$msExchProductId = (DSQUERY.exe * "CN=$ExOrgName,CN=Microsoft Exchange,CN=Services,CN=Configuration$($tempDomain)" -Scope base -Attr msExchProductId)[1].Trim()

Write-Host "rangeUpper (Schema)           : $rangeUpper ($(($rangeUpperHash.GetEnumerator() | ? {$_.Value -eq $rangeUpper}).Name -join ' | '))"
Write-Host "objectVersion (Default)       : $objVerDNC ($(($objVerDNCHash.GetEnumerator() | ? {$_.Value -eq $objVerDNC}).Name -join ' | '))"
Write-Host "objectVersion (Configuration) : $objVerCNC ($(($objVerCNCHash.GetEnumerator() | ? {$_.Value -eq $objVerCNC}).Name -join ' | '))"
Write-Host "msExchProductId               : $msExchProductId ($(($msExchProductIdHash.GetEnumerator() | ? {$_.Value -eq $msExchProductId}).Name -join ' | '))"
 

Saturday, March 11, 2017

Exchange DAG Replication Port

Have you ever wondered what TCP port Exchange 2010/2013/2016 uses for database replication (log shipping and seeding)? That would be 64327 by default.

This can be checked using the Get-DatabaseAvailabilityGroup cmdlet:

Administrators can also change this default port is they so desire by using the Set-DatabaseAvailabilityGroup cmdlet with the -ReplicationPort parameter.
If you decide to do so, it is recommended to create a new Windows Firewall rule for the new port on all DAG members before the actual change to avoid any disruption to database replication. After the change, the existing firewall rule can then be deleted or updated (depending on the approach taken):

Friday, February 3, 2017

Disk space missing from Exchange LUN

I was recently troubleshooting an issue where the LUN disk space for one particular Exchange database kept reducing by around 3GB a day, even though the database had plenty of whitespace for use:
 
Looking at the properties of the mount point, I could see there was indeed 80GB left of free space, so the previous report was accurate:
 
However, looking at how much the Exchange database and log files were taking, there was supposed to be over 200GB free space!
 
 
After some digging around, it turns out this space was being used by Volume Shadow Copies. Using vssadmin tool, I could see 122GB being used by VSS (Volume Shadow Copy Service) for MDB11:

By listing all the shadows, we can check when this shadow copy was created. In my case, it was over a month’s old:
 
We can also get details regarding shadow copies on Windows servers by using a hidden utility named vssuirun.exe:
 
It turns out that this particular server was rebooted mid-backup, causing this orphaned shadow copy. Since all the backups were working, I could safely delete this shadow copy. To do this, I tried using the "vssadmin delete shadows /all" command to delete it, but received the following error:
Error: Snapshots were found, but they were outside of your allowed context. Try removing them with the backup application which created them.”
 
Despite being logged in as an admin, Windows won’t let me touch the shadow copy. Or better put, VSSadmin doesn’t like messing with snapshots taken by other applications. Enter DiskShadow, a “tool that exposes the functionality offered by the Volume Shadow Copy Service (VSS).” Using diskshadow we can double-check the shadow copy details we got with vssadmin:
 
 
To delete all shadow copies using diskshadow, we can run "delete shadows all" or, if we want to delete only a particular one (not relevant in this case as there was only one copy), we can specify the ID of the shadow copy we want to delete:
 
Once it has been deleted, we can confirm there are no more shadow copies lying around using DiskShadow:
 
Or using VSSadmin:
 
As expected, the space was then recovered :)

Thursday, December 1, 2016

Exchange Alerts using Microsoft Teams

Back in September I wrote the Exchange Monitoring Concerns? Pick Up the Slack article for TechGenix (later posted in my blog as Exchange alerting using Slack) about monitoring Exchange and sending mobile alerts to administrators using Slack, a messaging app for teams. At the time, Slack was one of the best apps I could find to easily generate alerts on mobile devices.

A few weeks ago, Microsoft announced Microsoft Teams, a competitor to Slack. From my short experience with it, Microsoft Teams seems to work great, especially since it’s fully integrated with the rest of the Office 365 suite. To learn more about Microsoft Teams, please watch this Microsoft Mechanics video.

The question now is: can we use Microsoft Teams to alert administrators on their mobile devices when something is wrong with their systems or application (such as Exchange)? Let’s find out!

Signing Up to Microsoft Teams
At the time of writing this article, Microsoft Teams is available in preview (since November 2, 2016) to eligible Office 365 commercial customers (Business Essentials, Business Premium, and Enterprise E1, E3, E4 and E5). It is expected the service will become generally available in the first quarter of calendar year 2017.

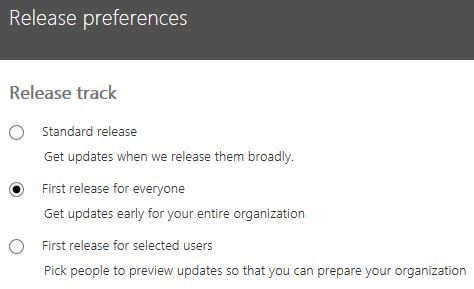
To turn on Microsoft Teams, IT admins should go to their Office 365 admin center, click Settings, click Organization profile and scroll down to Release preferences. In here, ensure preview features are enabled:
 
Now click on Apps:

On the list of available apps, search for Microsoft Teams and enable the service, plus all the required features you want to use:
 

Accessing Microsoft Teams
For some reason, after enabling Microsoft Teams, its icon is still not available in the app launcher:

However, if we navigate to https://teams.microsoft.com we will be able to login to the service just fine.

Similar to Slack, and many other Office 365 applications, Microsoft Team is available in three versions: web app, desktop app, and mobile app.

The purpose of this blog post is not to explain how to use Microsoft Teams (the Microsoft Mechanics video is a great place to start on that), but to see if and how we can use the service to programmatically send alerts to administrators on their mobile devices. But before we do so, we need to use the web or desktop apps to do some initial configuration. So let’s get to it.


Setting Up Microsoft Teams
The first step to configuring Microsoft Teams is to login to https://teams.microsoft.com, select Teams and create our first team by clicking on Create team:
 
Next we give our new team a name and a description (optional). If we are currently the owner of an Office 365 Group, we get the option to add Teams functionality to that group:
 
The final step (optional) is to add one or more members to our new team:
 
If we add users, each will receive an email notifying them they have been added to our new Messaging Team:

 
We now have our first Team created :)

 
Each Team can have multiple channels. Channels are how Microsoft Teams organizes conversations. We can set up our channels however we like: by topic, discipline, project, and so on. Channels are open to everyone on the team and contain their own files, OneNote, etc...

So let’s create one channel just for alerts by clicking on ... next to our team’s name and then Add channel:
 
Give the channel a name and click Add:

We now have our Alerts channel dedicated to Exchange alerts:
 

Configuring WebHook Connector
Office 365 Connectors are used to get information and content into Microsoft Teams. Any user can connect their team to services like Trello, GitHub, Bing News, Twitter, etc., and get notified of the team's activity in that service. Connectors also provide a way for developers to integrate with Microsoft Teams by building custom incoming WebHook Connectors to generate rich cards within channels.
To generate our alerts to administrators, we will create these cards (messages) by sending an HTTP request with a simple JavaScript Object Notation (JSON) payload to a Microsoft Teams webhook address.

First, we need to create a webhook address for our Alerts channel:
1. From within Microsoft Teams, click ... next to the channel name and then select Connectors:
 
2. Scroll through the list of connectors to Incoming Webhook, and click Add:
  
3. Enter a name for the webhook, upload an image to associate with data from the webhook (optional), and select Create:
  
4. Copy the webhook URL to the clipboard and save it. We will need this URL for sending information to our channel:
 
 5. Click Done and a message will be visible in the Conversations tab informing all members that an incoming webhook has been configured for the channel:

 
We now have our webhook configured which we will use to post messages to our Alert channel. If we go into Connectors one more time, we are informed that an Incoming Webhook is already configured and by whom. If we click on Manage we get the options to change its name (which I have changed to AlertsBot) and to remove the webhook.
 
Please be aware that any member of the team can get the webhook URL and use it to send messages. On top of that, any member can also remove the webhook...

 
Sending Messages to Microsoft Teams
Now that we have our webhook configured, we need a method to send an HTTP request with a JSON payload to the webhook address. To achieve this, we have two options. The first option is to use cURL, a tool used in command lines or scripts to transfer data with URLs. Since my workstation is 64-bit, I downloaded the Win64 - Generic version (at the time of writing this blog, v7.51.0).
 
From the command line (not PowerShell), we can use the following command to send a basic “Hello World!” message to our channel:
curl.exe -H “Content-Type: application/json” -d “{\”text\”: \”Hello World!\”}”

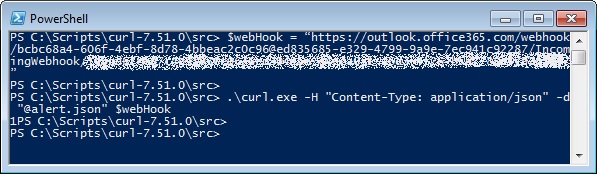
If the POST succeeds, we will get a simple 1 returned by cURL:
 
If we go back to our channel’s Conversation window, we can see the new card posted to the team:
 
Our first programmatic alert/message to Microsoft Teams! :-D


Doing the same using PowerShell and cURL is a bit more tricky because of the “ (quotes) within the code. In the example above we used \” to escape the quotes, which will not work with PowerShell. The easiest method I found was to put the whole payload in a file (let’s call it alert.json, but we can also use alert.txt for example) and then pass the file into cURL. The file will look like this:
 
And the code used will be the following:
$webHook = “https://outlook.office365.com/webhook/bcbc68a4-606f-4ebf-8d78-4bbeac2c0c96@ed835685-e329-4799-9a9e-7ec941c92287/IncomingWebhook/(...)"

.\curl.exe -H “Content-Type: application/json” -d “@alert.json” $webHook


The second option to send messages to Microsoft Teams (and a much easier one!), is to simply use PowerShell’s native capabilities with the following two cmdlets:
Invoke-RestMethod: sends HTTP/HTTPS requests to Representational State Transfer (REST) web services;
ConvertTo-Json: converts any object to a string in JSON format. The properties are converted to field names, the field values are converted to property values, and the methods are removed.


Using these two cmdlets, we don’t need cURL anymore. Our previous “Hello World!” example becomes simply the following:

$webHook = “https://outlook.office365.com/webhook/bcbc68a4-606f-4ebf-8d78-4bbeac2c0c96@ed835685-e329-4799-9a9e-7ec941c92287/IncomingWebhook/(...)”

$alert = ConvertTo-JSON @{
text = “Hello World!”
}

Invoke-RestMethod -ContentType “application/json” -Method Post -body $alert -Uri $webHook

Simple as that! :)

If we manually run the code just to see what the variable $alert contains, we will see that it is in the exact same (JSON) format as our alert.json file:
  
 
In our next example, we start to get live data from Exchange and report on it. This simple example just sends a message containing certain details about a mailbox database named MDB01:
$webHook = “https://outlook.office365.com/webhook/bcbc68a4-606f-4ebf-8d78-4bbeac2c0c96@ed835685-e329-4799-9a9e-7ec941c92287/IncomingWebhook/(...)”

$exchDB = Get-MailboxDatabase “MDB01” -Status | Select Name, LastFullBackup, DatabaseSize, Mounted, ServerName
$userCount = (Get-Mailbox -Database $exchDB.Name -ResultSize Unlimited).Count
$size = $($exchDB.DatabaseSize.Split(“(“)[0])

$alert = ConvertTo-Json -Depth 4 @{
  text = “**$($exchDB.Name) Information:**”
  sections = @(
    @{
      facts = @(
        @{
        name = "Database:"
        value = $exchDB.Name
        },
        @{
        name = "Last Bck:"
        value = $exchDB.LastFullBackup
        },
        @{
        name = "Size (GB):"
        value = $size
        },
        @{
        name = "Mounted?"
        value = $($exchDB.Mounted)
        },
        @{
        name = "On Server:"
        value = $exchDB.ServerName
        },
        @{
        name = "User Count:"
        value = $userCount
        }
      )
    }
  )
}

Invoke-RestMethod -ContentType "application/json" -Method Post -body $alert -Uri $webHook

The result will be all the details for MDB01 nicely formatted:
 
 
Let’s now look at how we could monitor Exchange’s transport queues and issue an alert if the total number of queued emails goes beyond a certain limit. To achieve this, we get the queues across all servers, exclude any Shadow Redundancy emails, and count the total number of emails across the queues. Then, if that number is above our limit, we send an alert. Obviously, this is a basic script just for demonstration purposes. In a production environment, a few tweaks would likely be required, such as the threshold limit, any queues or servers to include/exclude, use a scheduled task instead perhaps, and so on.
$webHook = “https://outlook.office365.com/webhook/bcbc68a4-606f-4ebf-8d78-4bbeac2c0c96@ed835685-e329-4799-9a9e-7ec941c92287/IncomingWebhook/(...)”

While ($True) {
[Int] $msgCount = 0
Get-TransportService | Get-Queue | Where {$_.MessageCount -gt 0 -and $_.DeliveryType -notlike "Shadow*"} | ForEach {$msgCount += $_.MessageCount}

If ($msgCount -gt 50) {
$alert = ConvertTo-Json -Depth 1 @{
text = “**High Mail Queues!**`nTotal queued emails: $msgCount”
}

Invoke-RestMethod -ContentType "application/json" -Method Post -body $alert -Uri $webHook
}
Start-Sleep –Seconds 1800
}

The result will be the following alert:
  
 
Microsoft Teams Mobile Client
The purpose of this post was not to test Microsoft Teams itself, but to test if it can be used to reliably alert administrators on their mobile devices with any potential issues with Exchange.

We already established that we can easily generate alerts to a Teams’ channel, but what we now need to test is Microsoft Teams’ mobile app. To show how platform-independent Microsoft Teams is, I am going to use an iPhone to test the mobile app (trust me, I am not an Apple fan) :)

We start by searching and downloading the app from the Apple Store:
  
Once we open the app for the first time, we are asked to sign in:
  
After signing in we are presented with four tips, the last one being about notifications, which for the purpose of this article, we should obviously enable:

  
Once we sign in we can easily see the message we previously sent:
 
  
According to Microsoft, the best way to make sure people see our message is to @mention them. We do this by typing @ before a name and choosing the person we want to mention from the picker. They will generate a notification and a number will appear next to the channel we mentioned them in. When we mention someone, no one else will receive a notification, but everyone in the team will be able to see that we @mentioned someone though. Alternatively, we can also mention the entire channel, which will make everyone receive a notification.

At this stage it seems that I only get an alert on my mobile phone when someone mentions me:
  
Notice my name highlighted in red and the “@” at the top right hand corner of the message:
 
 
So, I had a look at the Notification configuration in the app and found the following:
 
 
I was hoping that by enabling everything I would start getting a notification on my phone for everything, but this was not the case. I still don’t get an alert unless someone mentions me, or the entire channel, sends me a direct message, replies to a message of mine or likes something I posted.

The problem is that I haven’t been able to find a way of mentioning someone or a channel using cURL or PowerShell... :( This means that users will get the messages on their mobile devices but not a notification, making this method not suitable for what I am trying to achieve... This, of course, until I find a way of mentioning someone using JSON!

I found an article on Bot Builder for .NET that has a section about Activities and Mention Entities. This article states that we can mention someone using a JSON like this:

{   
  ...
  "entities": [{ 
    "type":"mention",
    "mentioned": { 
      "id": "UV341235", "name":"Color Bot"
    },
    "text": "@ColorBot"
  }]
  ...
}


But I still haven’t been able to make it work using PowerShell (or any other method for that matter!)...

So using both the web and desktop Team apps, I sent a few messages where I mentioned someone and captured the JSON payload to see exactly how these are constructed and sent. For example, the following message:
  
Translates into the following JSON:
 
So it should just be a matter of building an identical (except maybe for the ClientMessageID property) JSON, right? Nope... Unfortunately, even sending an identical JSON using PowerShell results in the exact same message but without the mention...


Conclusion
Surely I am missing something here because of my lack of JSON knowledge and experience... As such, it might be that adding or changing something really simple will make it work! As is, I can’t yet use Teams to reliably alert me until I figure how to mention someone...

Nonetheless, Microsoft Teams is an awesome product and I am looking forward to explore it even further!